MU.LAB Free - Adding Effects
What is an effect?
Audio effects are modulations applied to an audio signal to change
its character.
When an audio signal is recorded, it may have some defects or
not sound exactly like what is expected. Audio effects are signal processing
modules that take the audio signal and alter it by any means. The original signal
(dry) can be mixed with an effect to produce an altered sound (wet). The means
to do this are many.
- Another audio signal can be applied that will attenuate and
amplify certain frequencies.
- Another wave shape can be added or subtracted.
- Certain frequencies can be filtered out, others can be allowed to pass.
- The entire waveshape can be controlled.
- Phase can be altered.
- Speed, Tempo, and pitch can be altered.
- Part or all of the signal can be delayed and fed back (creates an echo).
- Part or all of the signal can be clipped (distortion)
- Amplitude can be limited - by frequency.
Many of these techniques are combined to create elaborate effects.
The variations are essentially unlimited creating a whole industry that provides
unique audio effects to produce unusual, but musical output. Furthermore, many
effects allow the control of the end result (wet or dry). The effects modules
(as you will see) can be very complex and have many different controls that
alter the signal in ways that you may not understand technically. However, by
tweaking each control, sometimes in concert with companion controls, the wet
audio signal can be easily monitored to get the desired result. It is beyond
the scope of this tutorial to get into how each effect is created. The number
of effects and combinations is staggering.
Effects modules are created by thousands of developers. Each developer
has their own ideas about how the effect should be controlled and presented
to the Audio musician. In effect (a pun), audio musicians must learn the nuances
of each effect module that they use and the learning process can be quite difficult
because these modules are so diverse. Please tour the internet searching for
VST Audio effects and check out the diversity of modules. Most developer websites
have a screenshot display of the appearance of their module. Many are extremely
impressive.
We will be discussing the use of VST audio effects that can be
inserted into your project as a 'insert' effect. That means that the output
of the effect module is inserted directly to the audio output down a one way
street called a buss. There may be stops along the way for additional effects
to get in on the action. In the MU.LAB studio, these busses are called Racks
and they have convenient empty slots for adding effects to a specific input
signal. This type of audio processing is very common in studio programs which
are set up similarly although sometimes the buss is not as clearly defined and
you may have to look deeper to find out where the signal is going. These Plugin
effects are sometimes called Insert Effects because they have been inserted
in the audio stream and the audio signal passes entirely through the inserted
effect.
Adding a VST Effect
So far we have only placed synths (VSTi) instruments in our VST
folder. Now it is time to add some effects modules. So let's return to the factory
where many effects have been made to satisfy a variety of needs. Use your browser
again and return to the mda
VST factory. Choose either the VST effects for Windows or for OSX and download
the ZIP file to your Download Folder. Once the file has been downloaded,
Open the ZIP file by double-clicking on the ZIP file name. At this time, we
are only going to install two effects:
- mda RezFilter - a filter and low frequency additive signal
processor
- mda Delay - An echo style delay module
So drag these from the ZIP folder to your VST folder. That's all
it takes to install these modules on your computer.
Start the MU.LAB Free program. Open the Clementine session.
Note: If you didn't make an audio recording, that's all
right. You can still do most of the tutorial which will apply mainly to the
mda-piano track. If you didn't save the Clementine session, go back to the Audio
Recording tutorial and follow the instructions to save the Clementine session
with a midi piano track.
Click on the FILE Button, and then select the VST Plugin
Manager. Click on Add VST Plugins button. Use the explorer to locate
your VST Folder, highlight it and then click on OK. Or you can
individually highlight and add each .dll file (.au file for OSX) - one at a
time. When the plugins have been added, Click on OK to exit. Click on OK
to exit the list of Plugins.
Add an Insert Effect
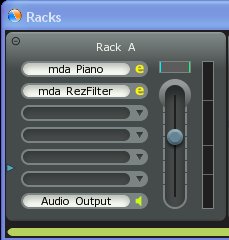 Click
in the first empty slot in Rack A. Then in the Choose Plugin box, select Effects>VST
and the MDA RezFilter. This will load the effect into the Rack and place the
effect in the Audio Stream. Right clicking on the mda RezFilter slot will reveal
a number of options for temporarily disabling the effect (Process Off) or you
can delete the effect if you choose not to use this effect. For now we will
leave the Process On. Click outside the box to close the box.
Click
in the first empty slot in Rack A. Then in the Choose Plugin box, select Effects>VST
and the MDA RezFilter. This will load the effect into the Rack and place the
effect in the Audio Stream. Right clicking on the mda RezFilter slot will reveal
a number of options for temporarily disabling the effect (Process Off) or you
can delete the effect if you choose not to use this effect. For now we will
leave the Process On. Click outside the box to close the box.
The effect name now appears in the window and a small 'e' button
will appear to the right. This is the edit button and is used to activate the
effect editor. Click on the 'e' button for the mda RezFilter and you will see
a display of all the controls.
Note: The mda RezFilter VST module has no special graphics
display associated with it. MU.LAB has a default capability to provide a graphics
display of the active controls in any VST module, so the display you see here
has been provided by MU.LAB.
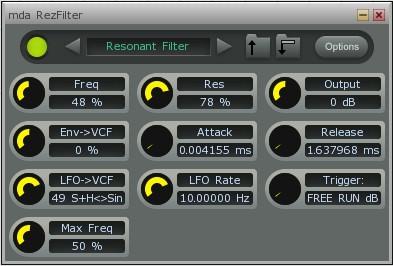 mda RezFilter - Each control in the default graphics display has a Knob
that can be twisted by clicking on the knob and dragging the mouse vertically
- Up = more, Down = less. Alongside the knob is its name and the current amount
of control displayed in text format. If the settings are too sensitive, press
the Ctrl key when moving the knob to get a finer control over the control amount.
mda RezFilter - Each control in the default graphics display has a Knob
that can be twisted by clicking on the knob and dragging the mouse vertically
- Up = more, Down = less. Alongside the knob is its name and the current amount
of control displayed in text format. If the settings are too sensitive, press
the Ctrl key when moving the knob to get a finer control over the control amount.
Set these controls approximately like the display:
- Freq 48%
- Res 78%
- Output 0dB
- Env->VCF 0%
- Attack (minimum)
- Release (minimum)
- LFO->VCF 49 S+H<>Sim
- LFO rate 10 Hz
- Trigger FREE RUN
- Max Freq 50%
Now play the tracks. You will note that the character of the mda-piano has
been significantly altered with a warbling effect. Play with the controls of
the RezFilter to gain some experience with each of the controls. You will note
that many of the controls have no effect unless other controls have come into
play. This is the nature of a complex effect. To hear the effects clearly, you
can mute the audio track (click on the little speaker to the left of a track
to mute it) and play only the mda-piano track. This allows you to listen to
the effect of the controls more easily.
Note: To get into the aspects of how each control may effect the Audio signal
is beyond the scope of this tutorial.
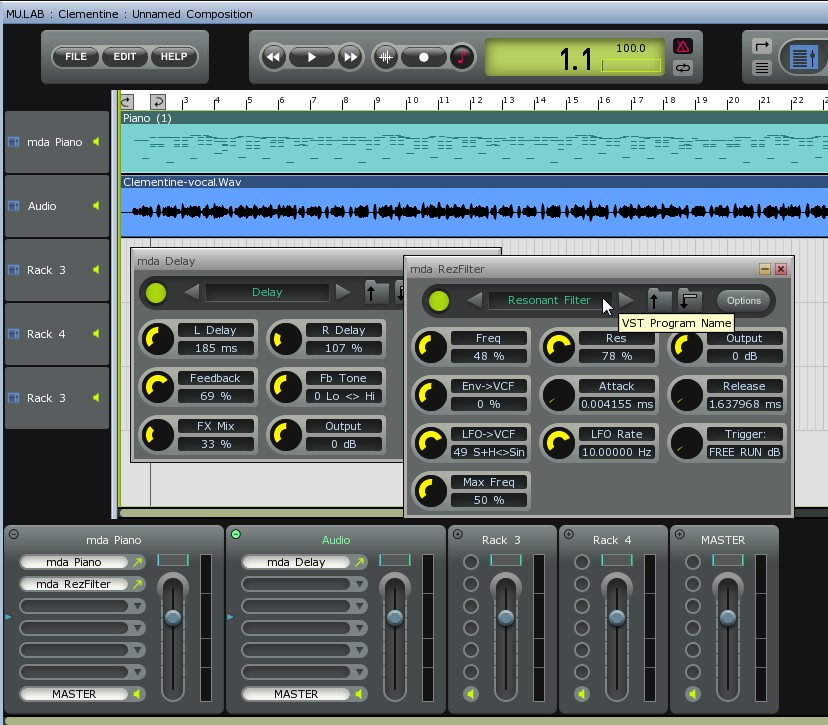
Add another insert effect
 mda
Delay - If the Audio track you are using has not yet been routed to a Rack,
then we will need to send the Audio stream that you recorded to another Rack
in order to gain control of the audio signal. Click on the Audio track that
you want to use and then assign the track to Rack B (upper right - see overall
view below). Although the Audio track is not shown in a slot in Rack B, it is
being routed to this Rack.
mda
Delay - If the Audio track you are using has not yet been routed to a Rack,
then we will need to send the Audio stream that you recorded to another Rack
in order to gain control of the audio signal. Click on the Audio track that
you want to use and then assign the track to Rack B (upper right - see overall
view below). Although the Audio track is not shown in a slot in Rack B, it is
being routed to this Rack.
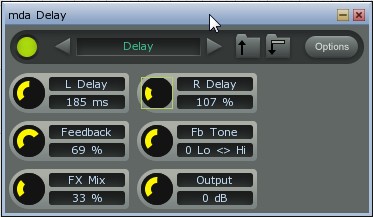
Click in the first Rack slot to get the Choose Plugin box. From the
Choose Plugin box, select Effect>VST and then click on mda Delay. The name
will appear in the slot and the little 'e' button will appear to the right.
Play the audio track to hear the delay effect. A pronounced echo will
be heard. Click on the 'e' button and move the L Delay down to about 30ms
and move the R Delay slider down to 0. Now the audio track recording
will sound much more natural but as if it was recorded in a larger room. The
delay is a mechanism to create an echo and it can be adjusted to allow the audio
signal to appear to have been recorded in an entirely different environment.
You can also add this effect to the mda piano mixing strip to get a similar
effect, but since the first RezFilter effect already has some delay in it, the
overall effect will not be as pronounced.
Note: In MU.LAB, you can insert several effects into each Rack. The effects
will be processed in the order that the effects appear in the Rack. To temporarily
Remove the processing of an effect, simply right-click in the effect slot and
choose Process Off. Or click on the Green On/Off button in the upper left cornet
of the VST effect display.
Save your session, so that these effects and their controls are also
saved.
Advanced
 In
MU.LAB, the Racks are extremely flexible.
In
MU.LAB, the Racks are extremely flexible.
If you click just to the left of the slot names, you will see a little triangle
pointer move to the place that you clicked. This pointer marks the position
that the Volume and PAN sliders will be effective. So, if you wish to control
the volume of the audio signal before it reaches an effect, you can place this
small pointer above the slot that contains the insert effect.
If you click on the last slot (currently named as 'Audio Output') you can redirect
the audio signal to another Rack. This redirection is sometime known as a 'Send'.
The major use of a 'Send' is to route more than one Audio signal to a Rack that
contains an effect that can control more than one Audio signal with a single
controller. This is very effective when using many tracks - such as a String
section - and you want to vary all of the strings together.
The little circle in the upper left corner of each Rack is a device to toggle
the width of the Rack to conserve space when many Racks are used. Look close
and you will see that the circle contains a '+' or a '-' depending on its condition.
Summary
VST effects will alter the audio signal in an almost infinite number of ways.
VST effects are stored as VST modules in the VST folder in a separate category
of 'Effects'.
To add an effect to the output of a track, simply direct the track output to
a Rack and then click on a slot in the Rack to insert a VST effect. The name
of the effect will appear in the slot and an 'e' (Edit) button will be placed
alongside the name. Click on the Edit button to access the controls for the
effect.
Note: MU.LAB also contains a few built in effects that can be inserted
into a Rack in the same manner as a VST effect. These effects can be selected
from the Choose Plug-In box by clicking on the MU.LAB Free explorer tree. You
may find MuVerb, Tempo Synced Stereo Echo, Multi-Mode Filter, and the MUX -
to build your own effects.